|
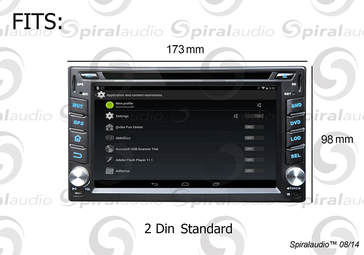
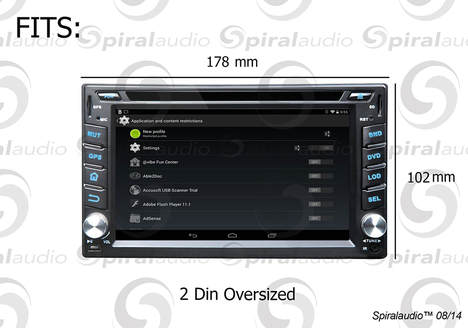
When purchasing a new aftermarket radio to install in your vehicle, there are so many options to choose from and it can be overwhelming if you are not informed about what's what. In a previous post, we explained the difference between single and double din radios, but that isn't the only choice you'll have to make with your new radio. First, there are the features that it offers, such as navigation, Bluetooth, AUX/USB inputs, etc. Then, there's the price...of course. But beyond that, there is another size difference with double din radios. A double din aftermarket radio from a well-known source like Pioneer, Kenwood, Sony, etc., will be the standard size; screens are typically between 6.2" and 7". These standard double din options will be compatible with the standard double din dash kits. But, what if you find a radio from another source like a brand from overseas? These overseas companies often times do not follow the same size standards that the well-known companies from the U.S. follow. And what happens is that people order them without knowing that the radio will ultimately be "oversized" even though the information says that it is a 7" screen. And then, the dash kit that was purchased for installation will be too small to fit the new oversized radio. So, what do you do? Well, you could modify the dash kit to force the new radio to fit, but this would be taking a big chance, especially if you aren't an installer and don't have the tools necessary! If it's not done absolutely perfect, you will end up with jagged edges and uneven lines. It will just look messy and unprofessional. It's for this very reason that we never recommend modifying dash kits. So, what's the other option? Well, give us a call! We carry lots of dash kits for oversized radios so that modification is not necessary for a perfect fit. Check out the dimensions below for standard and oversized radios. Notice that the dimensions are very close in size, but they are just enough different that the oversized radio will not fit in the standard size dash kit.
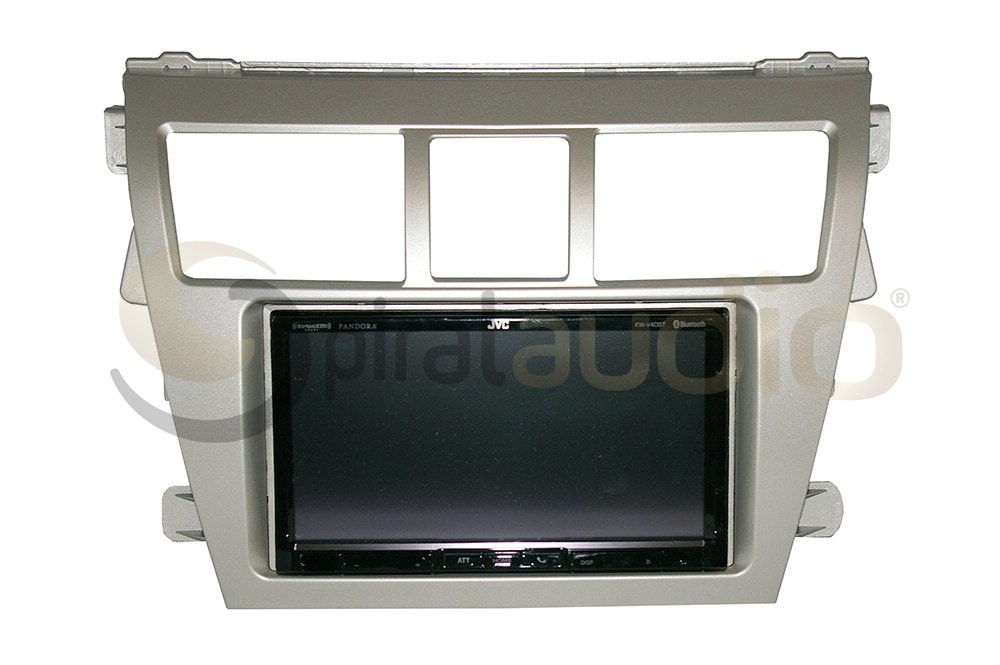
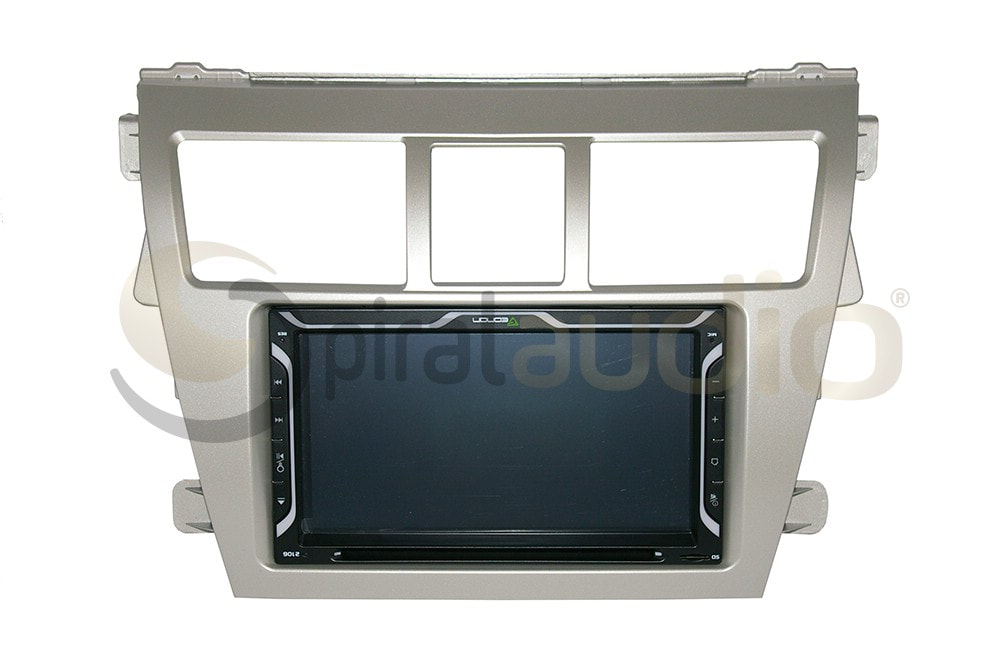
If you take a look below at a dash kit for the Toyota Yaris, you will see that both a standard double din and oversized double din can be installed perfectly with no gaps. This is just one of many dash kits that we offer with this capability.
Contact us today if you're looking for an oversized dash kit for your vehicle and new aftermarket radio!
0 Comments
With the summer season upon us, all of those D-I-Y outdoor projects are ready to be checked off your to-do list. First up...replacing that old factory radio. You know, you know...it's time to jump into this century and get yourself set up with a better sound system. So, we're here to help you on your way!
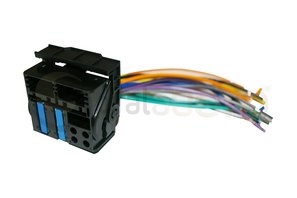
When someone says that catchy phrase "do-it-yourself", I immediately think to myself "how do-it-yourself is it, really?" Depending on your level of knowledge and interest in a particular area, a D-I-Y project can sometimes be a more daunting task than someone claims. That being said, the D-I-Y car radio installation project, with the right products in-hand, gets about a 3 out of 10 on our scale of difficulty...of course with 10 being the most difficult. Because the products that we sell revolve around the installation of car audio equipment, we thought it would be most helpful to provide our readers with a quick, yet informative, step-by-step process for installation. Now, keep in mind that there are definitely some situations out there that require a professional for installation and that is mainly due to the fact that the required accessories are not always available for every year, make and model of vehicle. But, for the majority, the steps below are will get you from point A to point B. Step 1: Purchase your vehicle Step 2: Realize that the sound system is super boring and needs a complete overhaul Step 3: Pick out your new system with all the bells and whistles...touchscreen receiver, navigation, Bluetooth, bumpin' speakers and woofers, high-power amp... Sorry...got carried away there. No, really...these are the actual steps: Step 1: Shop around for the products that are required for your vehicle. The following products are typical: aftermarket radio, installation tools, dash kit, wire harness/interface, antenna adapter, crimpers/butt-connectors, etc. As for your aftermarket radio, you have several options; single or double din, CD/DVD player, the newer App radios, or media player only. What the heck...you can even get a refurbished one! Whatever you choose, just make sure you avoid, at all costs, the knock-off or unknown brands as they are infamous for not following international fitment and compatibility standards. Ultimately, the money you save with those radios, you will end up spending at a professional to customize the install. Step 2: Retaining factory features. A lot of times there are features that come with vehicles that the owner wishes to retain; like premium sound systems, steering wheel controls (SWC), OnStar (GM vehicles), SYNC (Ford vehicles), factory Bluetooth, USB/Aux-in ports, Satellite radio...just to mention a few. Depending on the features you have and wish to retain, you can purchase your wire harness/interface based on your preferences. Step 3: Take the vehicle's dashboard apart. This may involve a bit of prying on your part, but can done more easily with specific removal tools. Step 4: Disconnect the vehicle's factory radio and wiring harness. You will notice that your new receiver comes with attached wiring and in order to avoid cutting any of your vehicle's factory wires, you will need to purchase a radio wire harness specifically for your year/make/model to act as a bridge between the vehicle and your new receiver's wires. Depending on the specific vehicle it can be a really simple wire harness or a more sophisticated wire harness interface that's needed. Step 5: Connect the new receiver to the vehicle. With your vehicle-specific radio wire harness/interface, you will now be ready to connect one end to the vehicle's harness and the other to the receiver's harness. *Depending on the vehicle, an antenna adapter may be necessary and will work similarly to the wire harness. Step 6: Attach the new dash kit. Once you have connected the new receiver, you will simply utilize the brackets, cage (if provided), and screws to mount the receiver into the opening left by the factory radio. Be sure to test your install to make sure that everything works. Then, after the new receiver is securely mounted, you can slide the panel and trims of the dash kit over it and firmly press it into place. You're all set! Now, was that so scary? We don't think so and hopefully we've shown you that this D-I-Y project is actually not the daunting task that it may seem at first. So, before you seek out a professional installer, think of the money that you could save by following these simple steps. For all of the installation items that you need for your vehicle, check out Spiral Audio or give us a call any time! We talk a lot about changing factory radios to aftermarket units and the parts that are required for installation, but today we thought it would be interesting to hear the other side. What if you want to re-install your factory radio but come to find out that the factory wiring has been cut? Or maybe your factory radio was stolen and the thieves cut the wiring in the act. How do you get your vehicle back to original factory quality? Well, there's a wire harness for that and it is often called a "reverse" wire harness or factory wire harness. A reverse wire harness looks very similar to the connectors for aftermarket radios, except in reverse. The harness is considered a "female" harness and will allow you to plug it into the connector found at the back of the factory radio as opposed to a "male" harness that is used for connecting the aftermarket radio. Each vehicle will have a specific wire harness that is pinned correctly to provide the radio with power and sound. Take a look at the difference in the wire harness for aftermarket radios and factory radios. You notice the same shape on the connector, but different face; one with pins and one without.
So, if you're in need of a reverse factory wire harness, check out website for your vehicle's factory harness! Factory Wiring Harnesses If you're in the car audio industry, single DIN and double DIN are two things that you hear every single day. And for someone that hears those words every day, the meaning is simple. But for someone that is new to car audio or replacing their factory radio for the first time, those words might sound foreign. So, for those of you that need to know the meaning, the basic explanation is that single DIN and double DIN are words used to describe the size of an aftermarket radio. DIN: The term originated in Germany and was used to express a standard industrial size for lots of different things. At some point along the line, it was used to describe the standard size of factory in-dash radios and years and years later, we are still using it. Single DIN: Radios with this size are fairly small (approximately 7 x 2"). They typically do not have touchscreens although sometimes will have a "flip" screen option where the radio flips out into a bigger touchscreen. When installed into a dash kit, single DIN radios will almost always have an open "pocket" below them, as shown in the picture below. 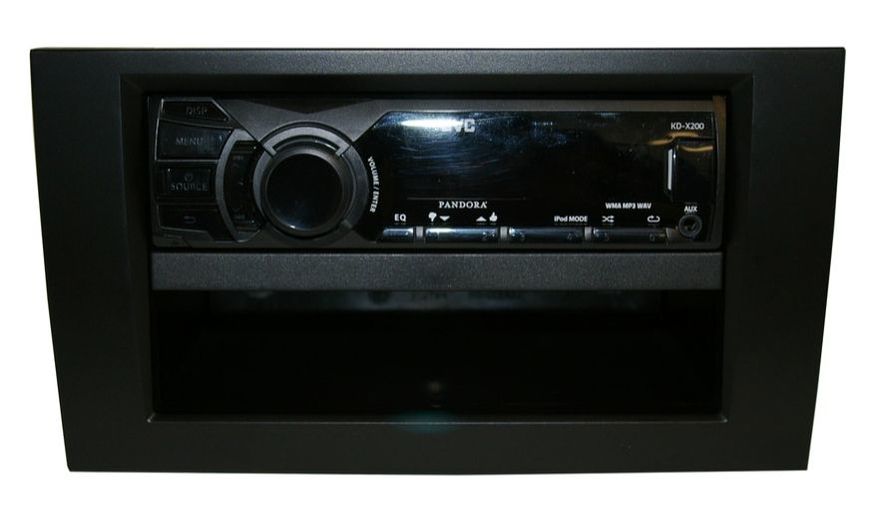 Double DIN: Also known as 2 DIN, the size is pretty easily understood since it is simply double the height size of a single DIN radio (approximately 7 x 4"). These radios are often equipped with touchscreens and offer more features such as navigation. These days, double DIN radios are more popular and because of the added features, typically have a higher price. When installed in a dash kit, the double DIN radio will take up the full opening as shown in the picture below. 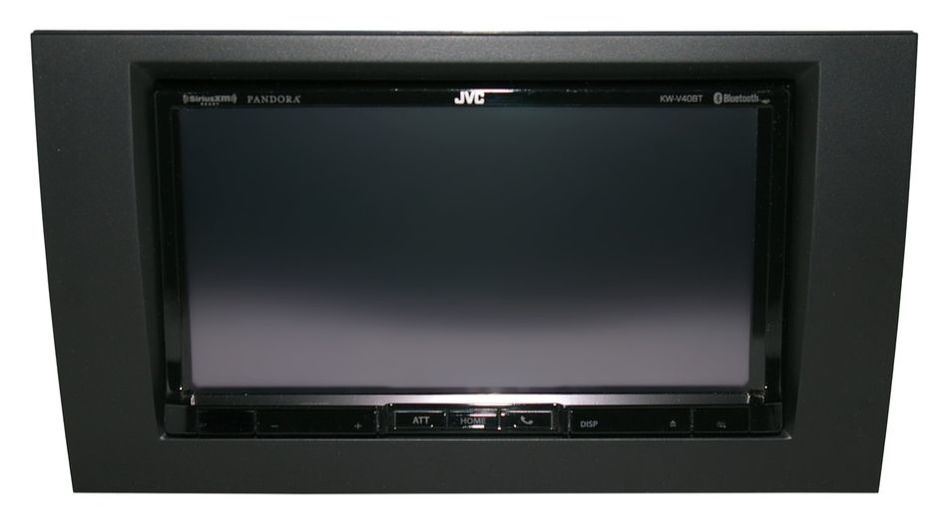 As you shop for your new aftermarket radio, there are a few things to keep in mind...
1. Regardless of the DIN size that you choose, you will need to be sure to purchase the correct size dash kit for installation. Some dash kits fit both sizes, but unless stated, most are sold separately (i.e. if you purchase a single din radio, you will need the specific single din dash kit). 2. If you want to avoid fitment issues, it is recommended to purchase a radio from a well-known brand like JVC, Kenwood, Pioneer, Sony, Alpine, Dual, Clarion, etc. These brands follow the international size standards for their radios and will fit perfectly in the appropriate dash kit. 3. If you are dead set on purchasing an aftermarket radio from overseas or a no-name brand because of the attractive price, just remember that you may run into fitment issues with the standard dash kit. We offer many "oversized" dash kit options to accommodate these radios and you can check that out on our website Spiral Audio. 4. Good luck and enjoy your new Single DIN or Double DIN aftermarket radio! If you're replacing the factory radio in your European or luxury vehicle, you have probably heard or read about the possibility of having a fiber optic amplified sound system. It is important to know if your vehicle is equipped with fiber optics because a specific wiring harness will be required for aftermarket radio installation. The specific wiring will retain this fiber optic sound system that would otherwise need to be bypassed by a professional and who wants to mess up the factory wiring?! So, when you take your factory radio to check for the presence of a fiber optic system, use the the pictures below that show 2 clear characteristics that assure you that the vehicle is fiber optic equipped. 1) Circular openings on the vehicle's factory connector. Instead of normal 'pins', these round openings allow for the installation of a fiber optic cables. 2) Orange color of on the vehicle's factory wiring. 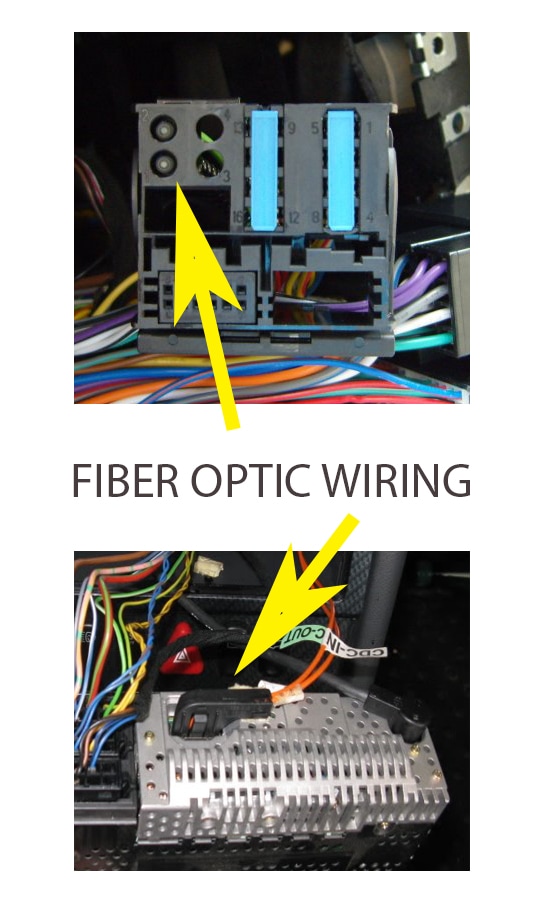 With these two characteristics of the factory wiring, you can be certain that your vehicle is equipped with a fiber optic sound system and will require a fiber optic wiring harness in order to replace the factory radio with an aftermarket radio.
Check our website for fiber optic wiring options for Porsche, Land Rover, Volvo, Mercedes Benz, and more! Spiral Audio Just because the dash in your car has a specific finish, that doesn't mean that you need to match it when replacing your factory radio. We offer several different finish options that allow you to play around a bit with the look of your new radio and the dash that surrounds it. Our Piano Black finish offers a glossy look that gives your car a more luxurious feel. Check out this installation on a 2014 Honda Civic that originally comes with a flat black finish. The glossy look gives the dash an elegance that it did not have before the installation. 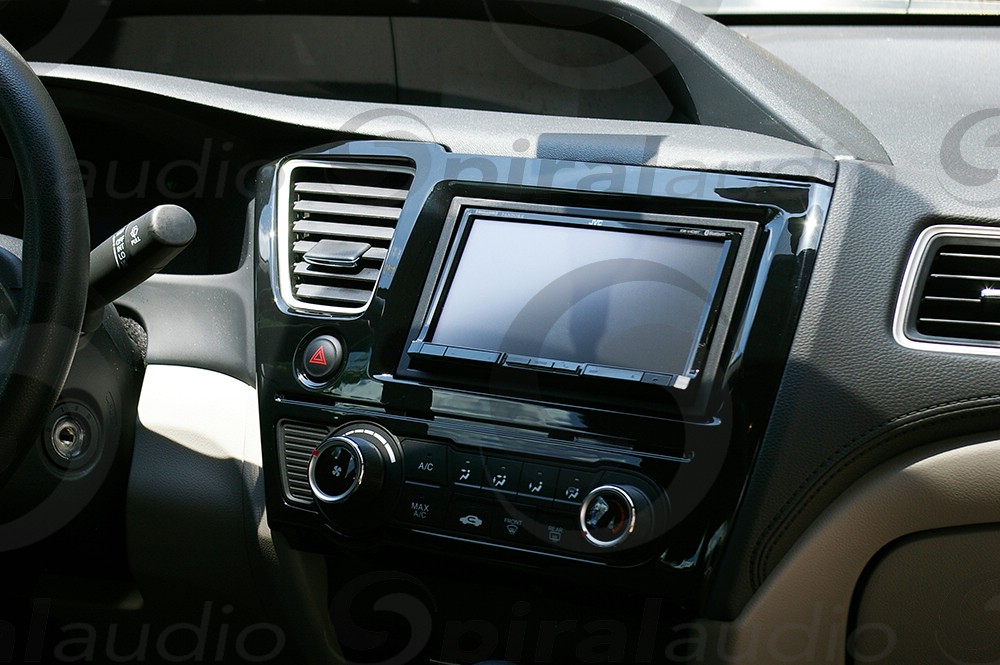 So, if you are in the market for installation products for your new aftermarket radio, consider going with one of our piano black finishes to gloss it up!
Why replace your car's factory radio with an aftermarket radio? There are lots of different reasons to replace your radio depending on the situation, but we give you 5 instances where it is necessary to do it ASAP.
5. It's broke... Ok, here's a no-brainer. Driving without music? Not a chance! If you can't listen to music while driving to work, or to the store, or to wherever you're going, then you need to install a new aftermarket radio immediately. And as for trying to get the radio fixed or putting the same factory radio back in...good luck! The money that you will spend trying to do that will be significantly more than installing an new aftermarket radio. Especially if you go with D-I-Y route with your install. You will save some mad bucks! All of the parts that we offer to install radios are plug and play, so if you have a little bit of time, you can easily install the new system. There is a common misconception that a professional installer is required, but this is just not the case. There are definitely great installers out there to do the work for a fair price, but if you have the inclination to D-I-Y, it can certainly be done. 4. It's outdated... This is a common one nowadays. With the advancement of technology over the past several years, older car radios can be very outdated. They don't have the plug-ins that you need like AUX & USB, they don't offer features like Bluetooth or navigation, and they most definitely don't have fancy touchscreens. A lot of the new aftermarket radios can make you feel like you have a brand new upgraded car with the amount of features that they offer. Everything from Bluetooth and audio streaming to Siri Eyes Free control and motorized touchscreens so that you can be safer while driving and utilize all of your gadgets like iPods and smartphones. So if you're in this situation, get your car up to speed (no pun intended) with a new aftermarket radio that comes with all the bells and whistles. Then connect that phone to Bluetooth and start jammin' out! 3. It was stolen... Another no-brainer here! If you have no radio at all, what are you waiting for? Trying to find the same factory radio to re-install or fixing one that has been damaged will cost you way more in the end than installing a new aftermarket radio. Even though it seems that a new radio might be more expensive because of the features that it offers, factory radio prices are usually way steeper. And if those thieves messed up your factory wiring, don't worry because we carry the reverse wiring harnesses that allow you to fix the damaged wiring before installing the aftermarket radio. So, when you go to sell your vehicle, you can let the buyer know that the wiring behind the radio is factory quality. 2. It sounds bad... Even if you aren't a huge critic of music and sound, rest assured that just by replacing the factory radio, you will find a big difference in the quality of sound that you hear. Audiophiles can probably skip this reason for replacing the car radio because it is probably one of the first things they did after buying their car. Even the premium sound system options can sound pretty weak, so putting an aftermarket system in is a must. In most cases, aftermarket radios will improve the sound quality even without replacing the factory speakers. Simply put, the new radio will provide more power to the stock speakers, allowing for better quality. And hey, if you want to upgrade the sound even more, go for aftermarket speakers too. 1. Just because... When you buy your car, you don't have many options when it comes to how the radio looks or sounds. Usually it's the basic package or a premium system, and that's all. Why not go out there an choose the exact radio that you want? Get all the features you want, with the look that you like, by purchasing an aftermarket radio. It's so easy to do when you have great companies like Spiral Audio, that carry all the products that you need to get it done! In our previous posts, we have covered what a premium amplified sound system is and what kind of harness is required for aftermarket radio installation. Now we want to go in a bit more depth about RCAs and the potential necessity for a Line Output Convertor (LOC).
With a wire harness that includes RCA connectors, it is obviously necessary to plug those connectors in somewhere. In a perfect scenario, your aftermarket radio not only includes RCA outputs, but includes the exact number of outputs that you need for the installation. You simply plug your wire harness connector into the vehicle’s harness behind the factory radio and then plug the RCAs into the aftermarket radio RCA outputs and you’re all set. But what happens when the aftermarket radio has only 2 outputs and you have 4 RCAs or when the radio has 0 outputs, but you have 2 or 4 RCAs? Cue the need for a LOC… A LOC is a small device that converts RCA connectors (low level) to regular speaker wire (high level), so that an installation can be completed with an aftermarket radio that does not have RCA outputs or has less than needed. Basically, the LOC is acting as a bridge from the wire harness with RCAs to the aftermarket radio without RCA outputs. Now, there are 2 options for LOCs; 2-channel and 4-channel. What does this mean, you ask? Easy! A 2-channel LOC allows for plugging in 2 RCA connectors while a 4-channel LOC allows for plugging in 4 RCA connectors. So, let’s do a little math for example: Wire harness includes: 4 RCAs Aftermarket radio includes: 2 RCA outputs You need: (1) 2-Channel LOC Makes sense yet? Let’s do one more: Wire harness includes 4 RCAs Aftermarket radio includes: 0 RCA outputs You need: (2) 2-Channel LOCs or (1) 4-Channel LOC See…it’s not too difficult to understand. Now you know what to do in the case that your aftermarket radio is lacking in RCA outputs, but you have a wire harness with RCA connectors. Last week we discussed how to know if a vehicle is equipped with a premium factory amplified sound system; a question that arises on a daily basis. Since it is such an important part of aftermarket radio installation, we believe it is also important to understand what it means to have a premium amplified sound system. Before even starting a search for installation products, knowing if your system is factory amplified will help to narrow the available options for radio wiring. From time to time, there will be vehicles that use the same wiring for both non-amplified and amplified systems, but the majority of vehicles have different wiring.
Having a non-amplified sound system doesn't actually mean that there is no amplifier present in the vehicle; it really means that the amplifier is built-in the factory radio. So when you hear sound, it is the built-in amplifier in the factory radio that is driving the speakers to make that sound. In amplified sound systems, a separate amplifier or subwoofer will be present somewhere in the vehicle. These amplifiers and subwoofers can be found underneath seats, in the trunk, behind the dash, etc. and their main purpose is to intensify the sound coming from the speakers...amping up the sound! In this case, when you hear sound, it is the separate amplifier that is driving the speakers to produce that sound. If the vehicle has an amplified system, it is going to have one of the following: 1) analog amplifier, 2) digital amplifier, or 3) fiber optic amplifier. Let's talk about the difference... Analog amplifiers input low-current signals and output more intensified sound of the same signal. These amplified systems require pretty basic wiring that includes RCA connections in order to retain the amplifier and produce sound through the speakers. With these RCA connections comes the potential necessity for a LOC (Line Output Converter), but we'll talk more about that at another time. Digital amplifiers take the incoming signal and convert it to a digital signal. These amplified systems require the use of wiring that includes a data interface in order to digitally convert the signal. They are more expensive than the wiring for the analog amplified systems because of the electronic data interface. Fiber optic amplifiers, the most complex of all, carry the signal by using light that is produced by tiny lasers in the wiring. There is no need for electronic conversion with fiber optics like there is with the digital amplifier, but an interface is often a part of the wiring necessary for installation. Fiber optic amplifiers are common among luxury vehicles such as Mercedes Benz, BMW, Land Rover, and Porsche, among others. They are almost never seen in standard makes. Does your vehicle come equipped with a premium factory amplified sound system? If so, then you'll need specific wiring for your aftermarket radio installation. The good thing is that now you know the different types of amplifiers and the wiring required for them. The even better thing is that you can visit Spiral Audio and find all of the wiring solutions for your vehicle! It is very important to know whether a vehicle is equipped with a premium factory amplified sound system before trying to install an aftermarket radio. One of the most common problems that we run into with our customers is that they purchase a wire harness that is only compatible with non-amplified systems and just when they are in the midst of installing the radio, they realize that something is wrong. Many times, but not always, the wire harness for non-amplified systems is the less expensive option and since it looks like it will fit, there is hope that it will work too! Unfortunately, just because a wire harness fits doesn't mean that it is going to function. Here are a few ways to help in determining if your vehicle is equipped with a premium amplified system so that you can save yourself time and be certain to purchase the correct wire harness for your installation.
1. The easiest way is to take a look at the front of the factory radio and/or the factory speakers to see a brand name or the word "premium". There are a lot of different premium brands out there, but the most popular are: Bose, Infinity, JBL, Mark Levinson, Harman Kardon, Boston Acoustics, Kicker, Rockford Fosgate, Nakamichi, Alpine, Monsoon, Sony etc. If you do not see any of the premium brands or the word "premium", you may want to check your owner's manual to see if there is anything there. 2. Verify if your vehicle is equipped with more than 4 speakers. Often times, if it has more than the normal 4 speakers, it is equipped with a premium sound system. This is not always the case though as the newer vehicles are coming with a standard 6 or 8 speaker system, so it is recommended to get confirmation. 3. In some extreme cases, like Saab vehicles, it is necessary to check the back of the factory radio. In these cases, there is no other way to verify whether the system is amplified or not. Whether you are new to car stereo installation or are having trouble verifying the sound system in your vehicle, hopefully these tips help out! But, if you need more help...give us a call or send us an e-mail so that we can point you in the right direction. |
Archives
July 2017
Categories |

 RSS Feed
